
PCA4CD
PCA4CD
PCA4CD is a QGIS plugin that computes Principal Component Analysis (PCA) and can create a change detection layer using PCA's dimensionality reduction properties.
View the Project on GitHub
SMByC/PCA4CD
PCA4CD
PCA4CD is a QGIS plugin that computes Principal Component Analysis (PCA) and can create a change detection layer using PCA’s dimensionality reduction properties. Designed mainly with the goal of:
- Generate (or load) the principal components (PCA) of the input layers
- (optional) Build the change detection layer based on the dimensionality reduction properties of PCA.
First, the main window is divided by two sections:
The following steps are:
1a. Compute the principal components
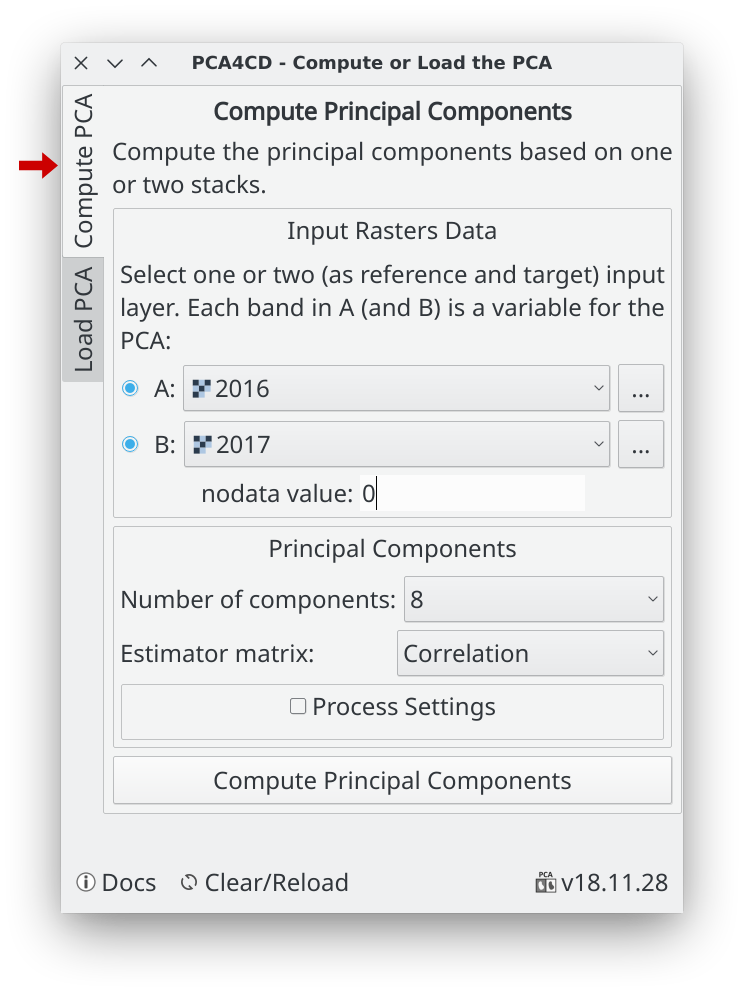
Input layers
Select one or two input layer with or without multi-bands. If you use one layer (A) you must have all bands to process in it, instead if you want, for example, analysis two different periods for the same region is better use two layers, you can put the reference layer in (A) and the target layer in (B).
Warning: If you use A and B layers,the plugin required that both layers have the same extent, the same pixel size and same projection.
Is important to know that each band in A (and B if enabled) is a variable for PCA, then the maximum number of components for compute is the total of bands in A (plus bands in B).
Nodata value
The no data value is very important to set if the image have no valid value, else the PCA will be very affected by it. The nodata value set automatically from the stack A if this has the nodata value set as metadata inside the file.
The estimator matrix
Use Correlation or Covariance depend on the data and of type of data (by default and recommended is the correlation). Some points about the use of these two specific estimators in the dimensionality reduction process:
-
The covariance is dependent on the scale of the variables
-
The correlation coefficients are insensitive to the variation of the dispersion of the data, so the covariance produces structures of better defined factors (Tinsley & Tinsley, 1987)
-
Use covariance to preserve variance if the range and scale of the variables are similar or in the same units of measure.
-
Use the correlation when the range within the variable and the scale differ widely (variables such as temperature, pressure, humidity, etc.)
Process settings
To compute the principal components for a image, like a Landsat scene or bigger, required relatively a heavy computation, the PCA4CD compute the PCA in parallel process for reducing the time and the memory usage. However, good free RAM memory is required for not crash in the process, if this happens, try to use lower values in these parameters.
1b. Load the principal components

This is for analysis and creates the change layer of the principal components already generated, then you must load the principal components externally, this could have been generated with this plugin or not, but is important that bands are in order respect to the components of PCA.
The no data value is very important to set if the image have no valid value. The nodata value set automatically from the stack A if this has the nodata value set as metadata inside the file.
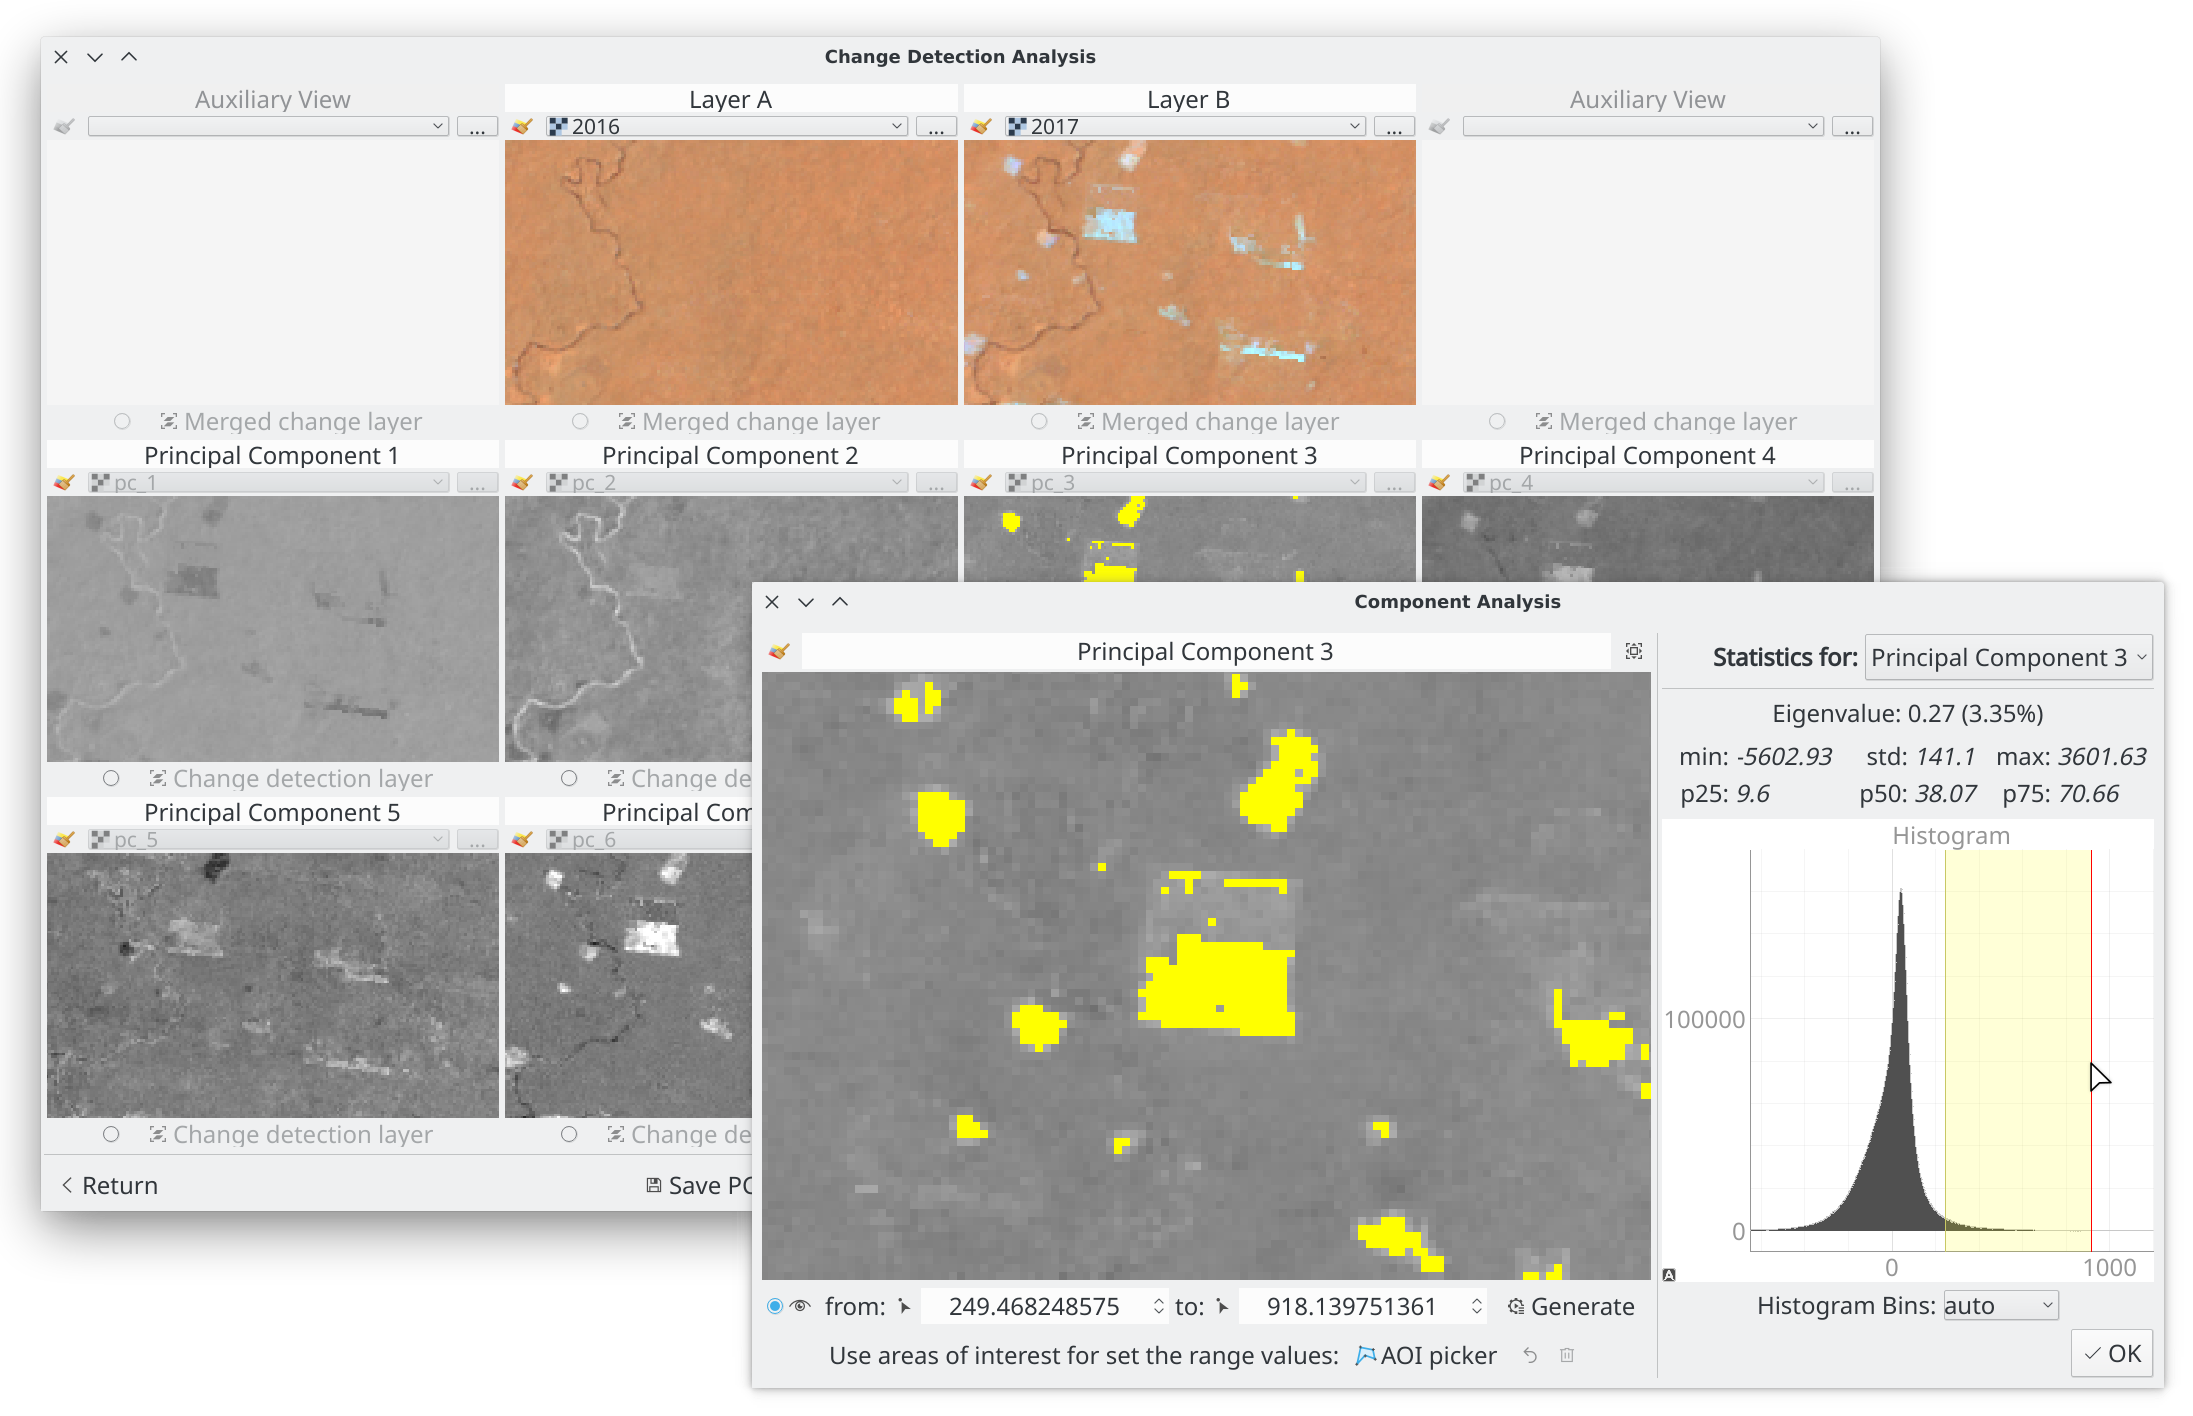
2. Change Detection Analysis
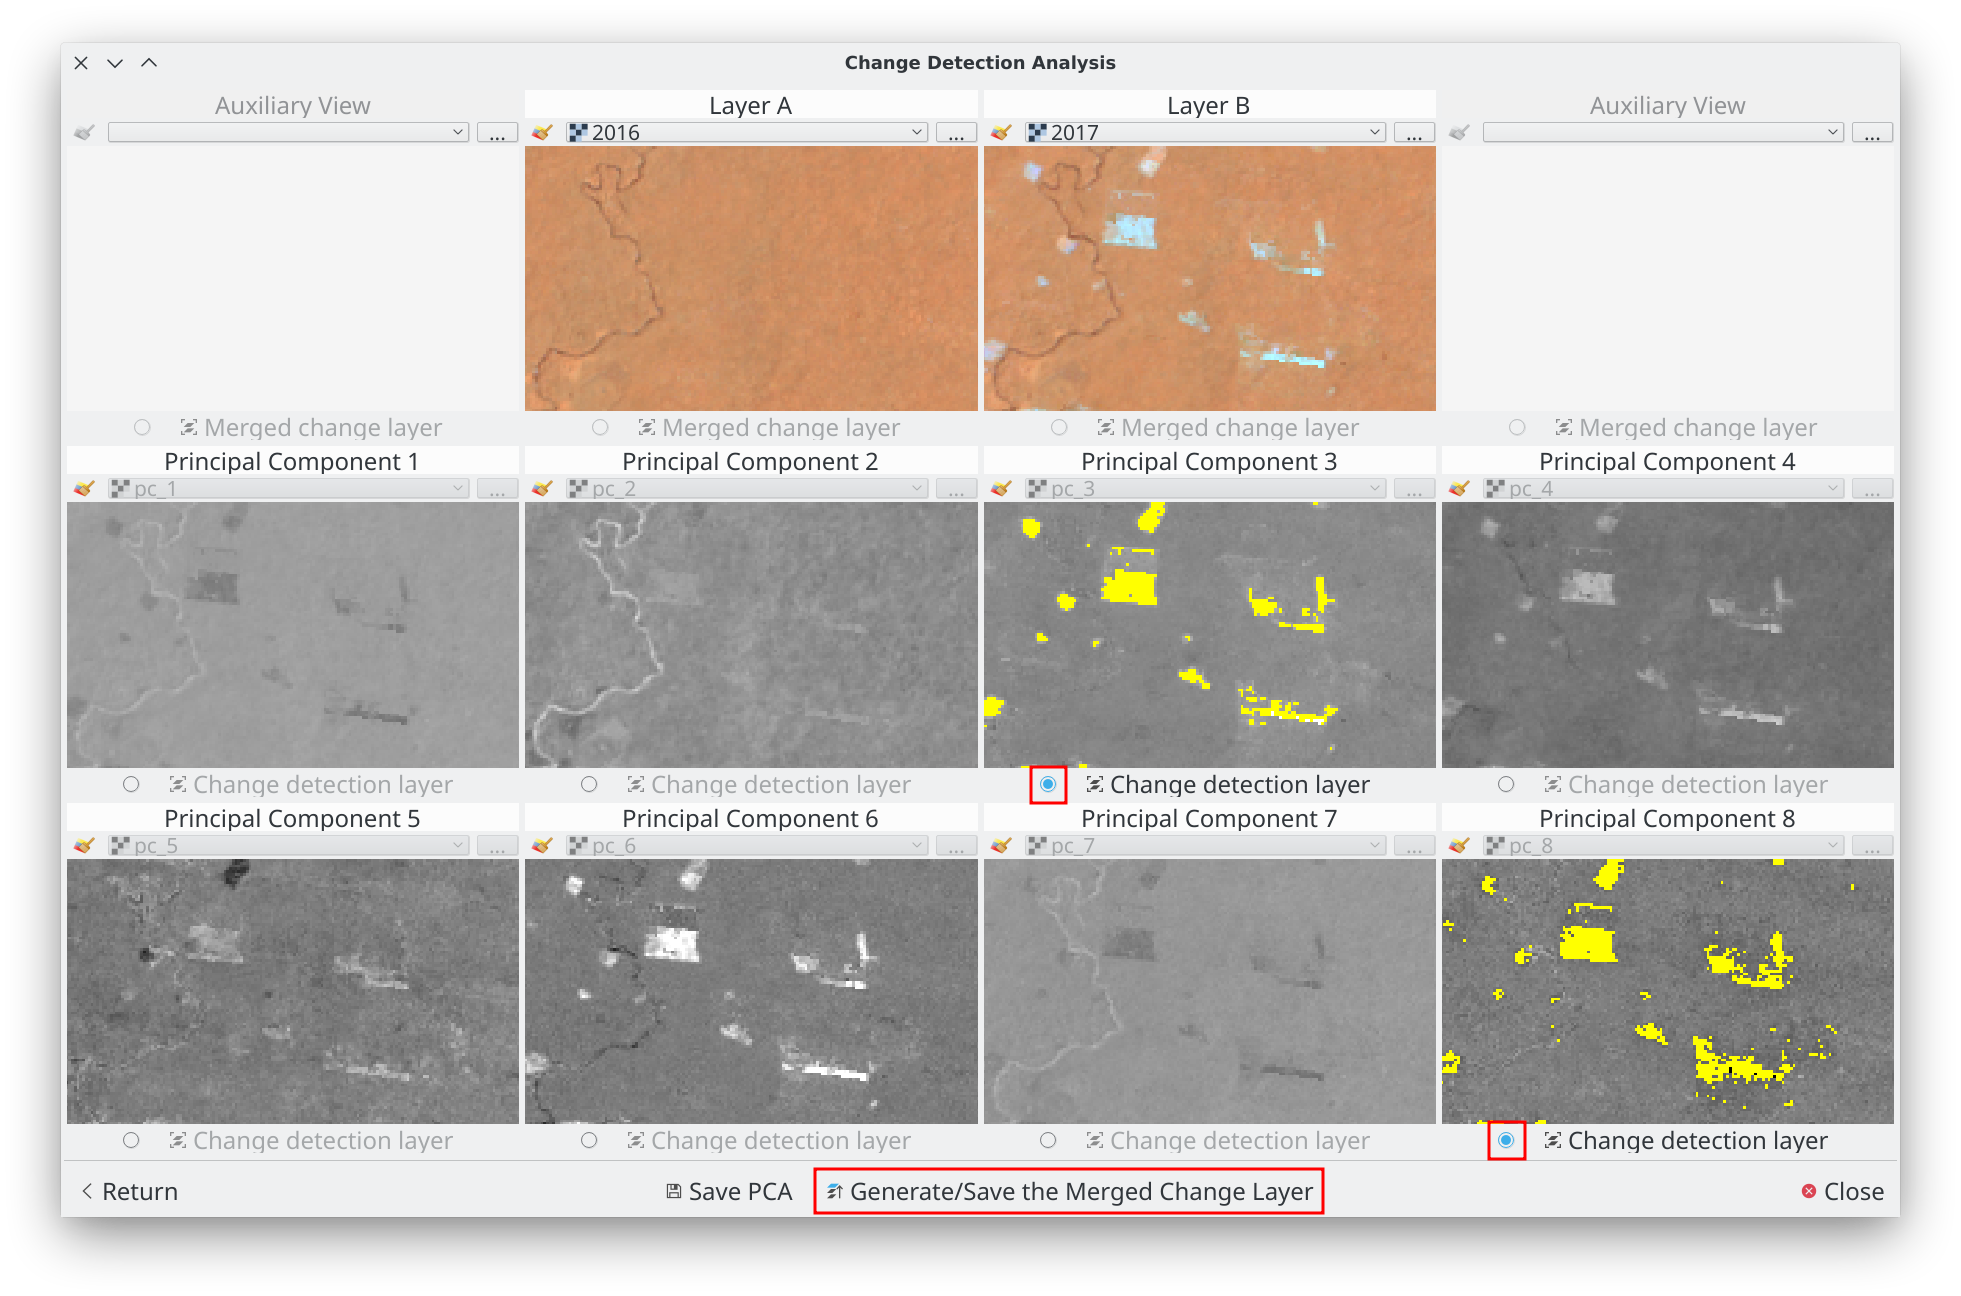
After compute or load the principal components, the plugin open the following change detection analysis dialog:

A. Principal row: In the center in the first row, the original input layer A (and B) is shown, these could be used as a reference of analysis, however you can change it if you want.
B. Components rows: The next rows are for the principal components computed or loaded. The size of the dialog is changed based of the number of principal components.
C. Save PCA: (Optional) This button is for save all the principal components generated as bands in one stack.
D. Generate/Save the Merged Change Layer: Merge all created and activated change layers of the principal components views (use this as the last step of the process, see below)
2a. Generate the change layer by component
Use the principal row (input and auxiliary layers) in the “change detection analysis” dialog to find and choose the better components (one or more) that capture the changes you want.
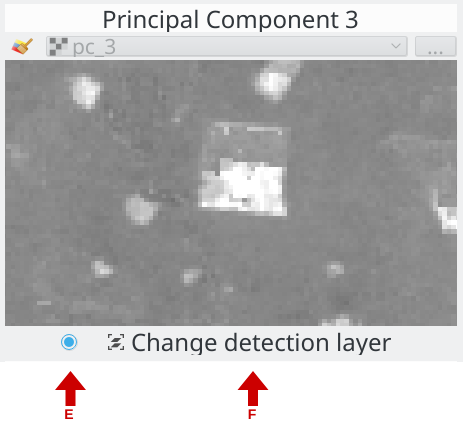
In this example, I picked the component 3 and 8
E. Enable/disable the change layer: When the change layer is created this is useful for show/hide the change layer. You must activate this for enable the “change detection layer” (F) button.
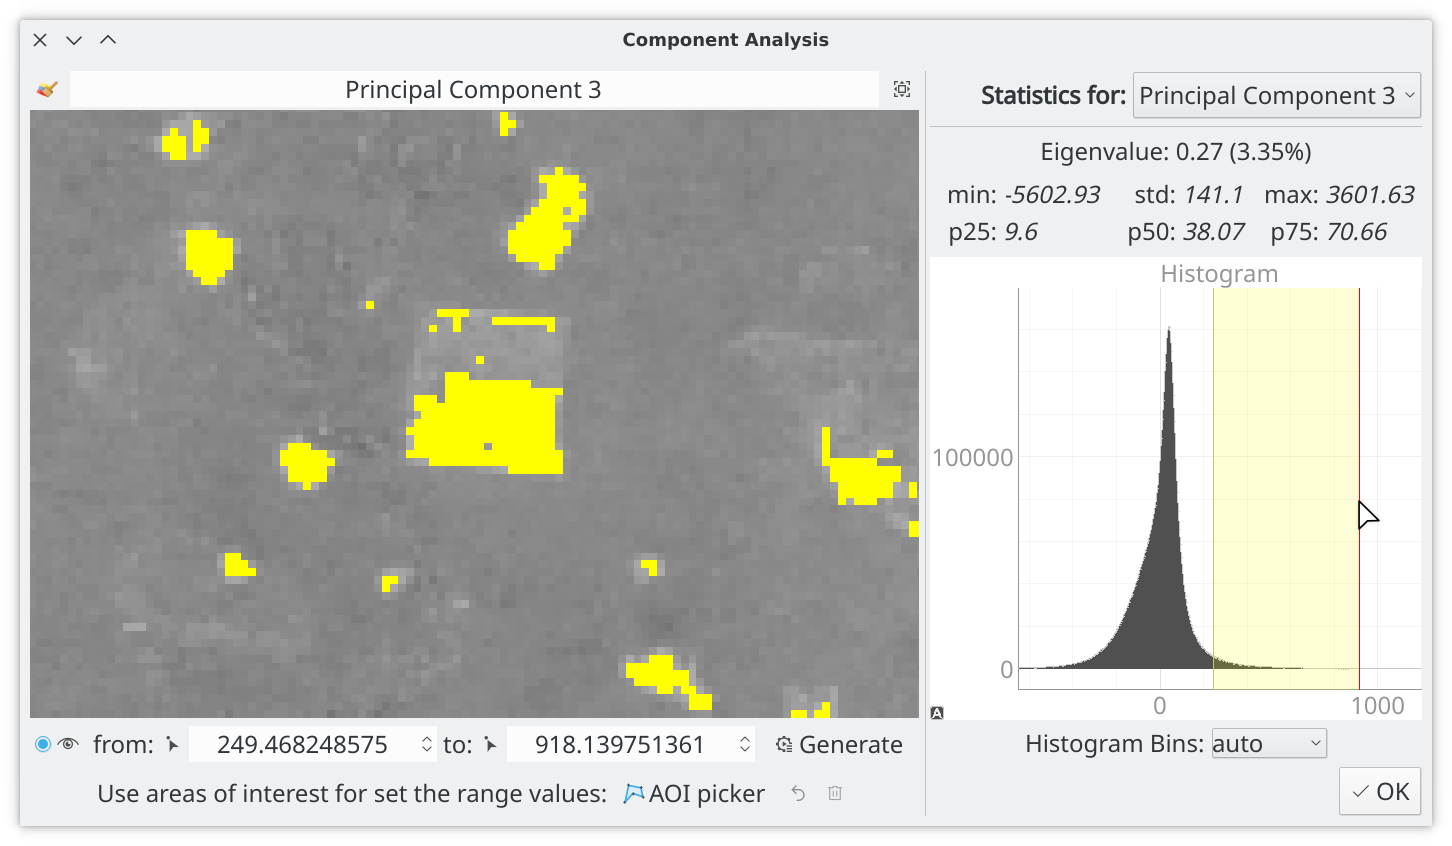
F. Change detection layer: This open the “Component Analysis” dialog for this principal component.
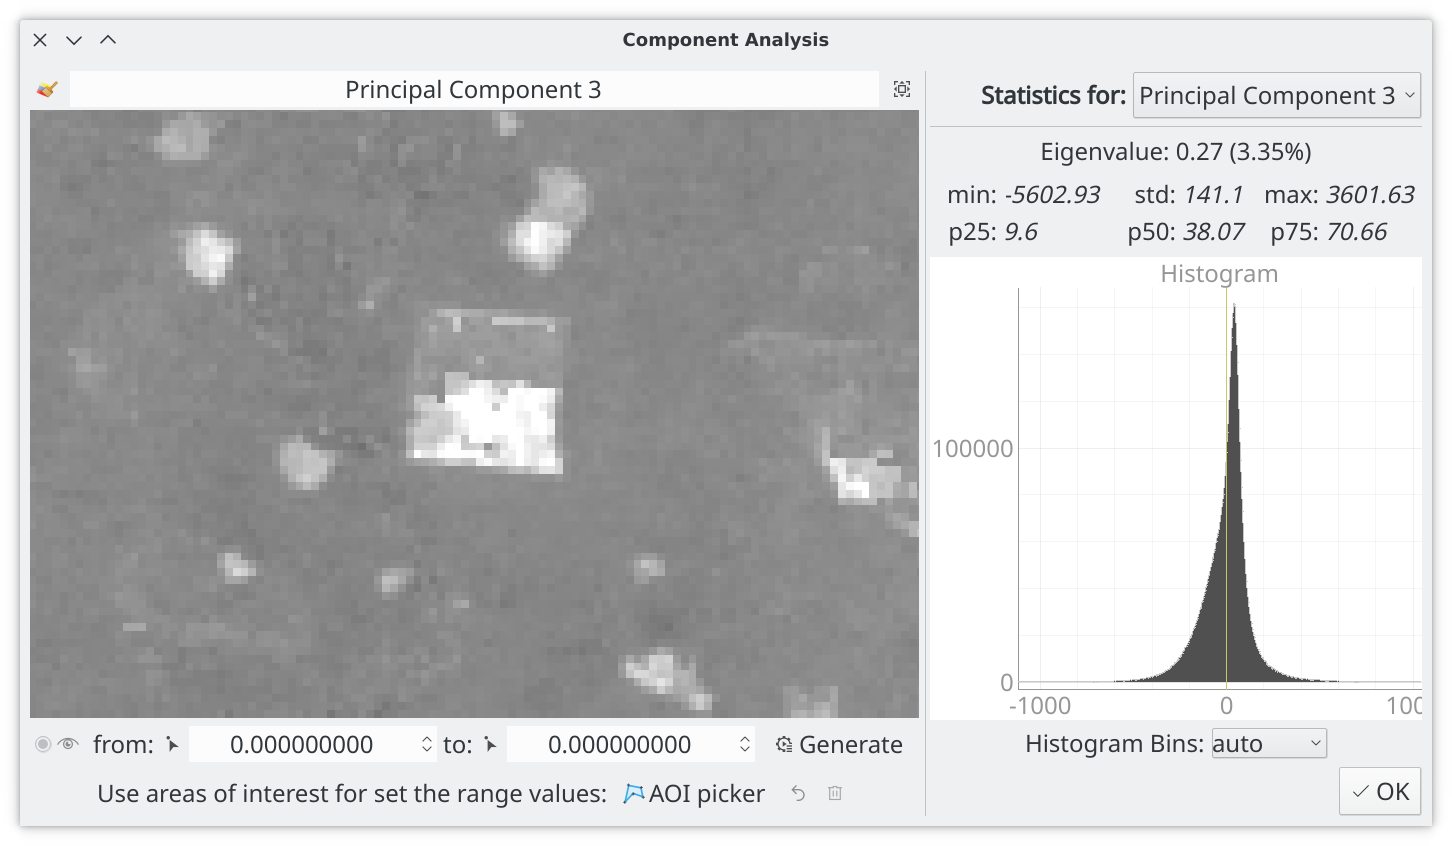
With this dialog, you can generate the change detection layer using a range of values (lower and upper). The plugin provides three ways for choosing the correct range of values depends on you looking for.
-
Using the mouse picker: Pick the value using the mouse over the image using the from value picker and to value picker mouse tool. The value is fixed using the left mouse button. When the two values are set, click in Generate for compute the change detection layer.

-
Using AOI picker: You can use several areas of interest using the AOI picker to capturing the values in the image that represent the change you want of this component. The plugin updates the statistics automatically for the pixels inside the AOIs and computes the minimum and maximum as the range of the change detection layer.
Tips for the AOI picker: left mouse button for create new point of the AOI, esc or backspace keyboard key for delete the last point, right mouse button for finish the current AOI. The change detection layer is automatically created/updated every new AOI.

-
Using the histogram: The histogram is interactive, you can zoom in/out and stretch. The range values is the yellow area, you can change it manually with the mouse, when the yellow area is changed the range values change automatically (and vice versa), then do click in Generate for compute the change detection layer.
2b. Generate the merge change layer
When you have generated all change layers by components, you must active/enable the change detection layers (E button) for all layer that you want inside the final change layer.
then do click on “Generate/Save the Merged Change Layer” button, this open the merge dialog:
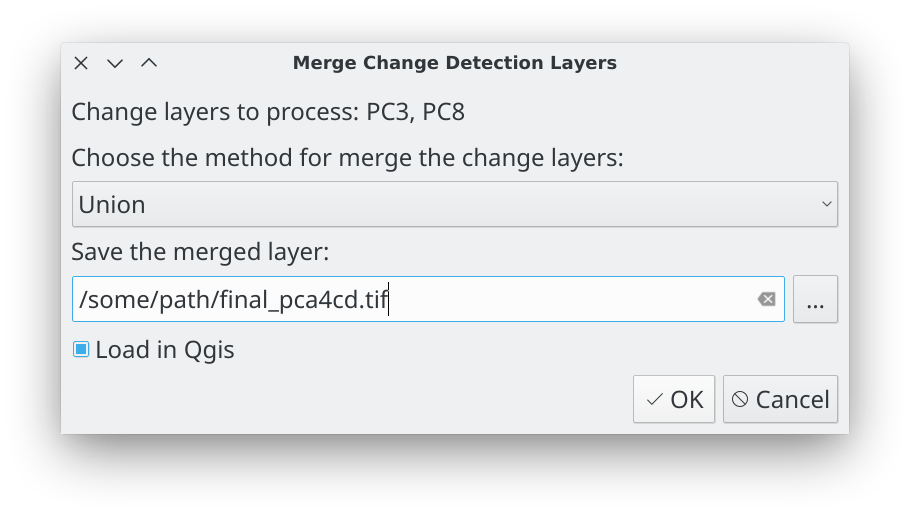
Choose the method for merge, select the file for store the final merge layer and do click in Ok button.
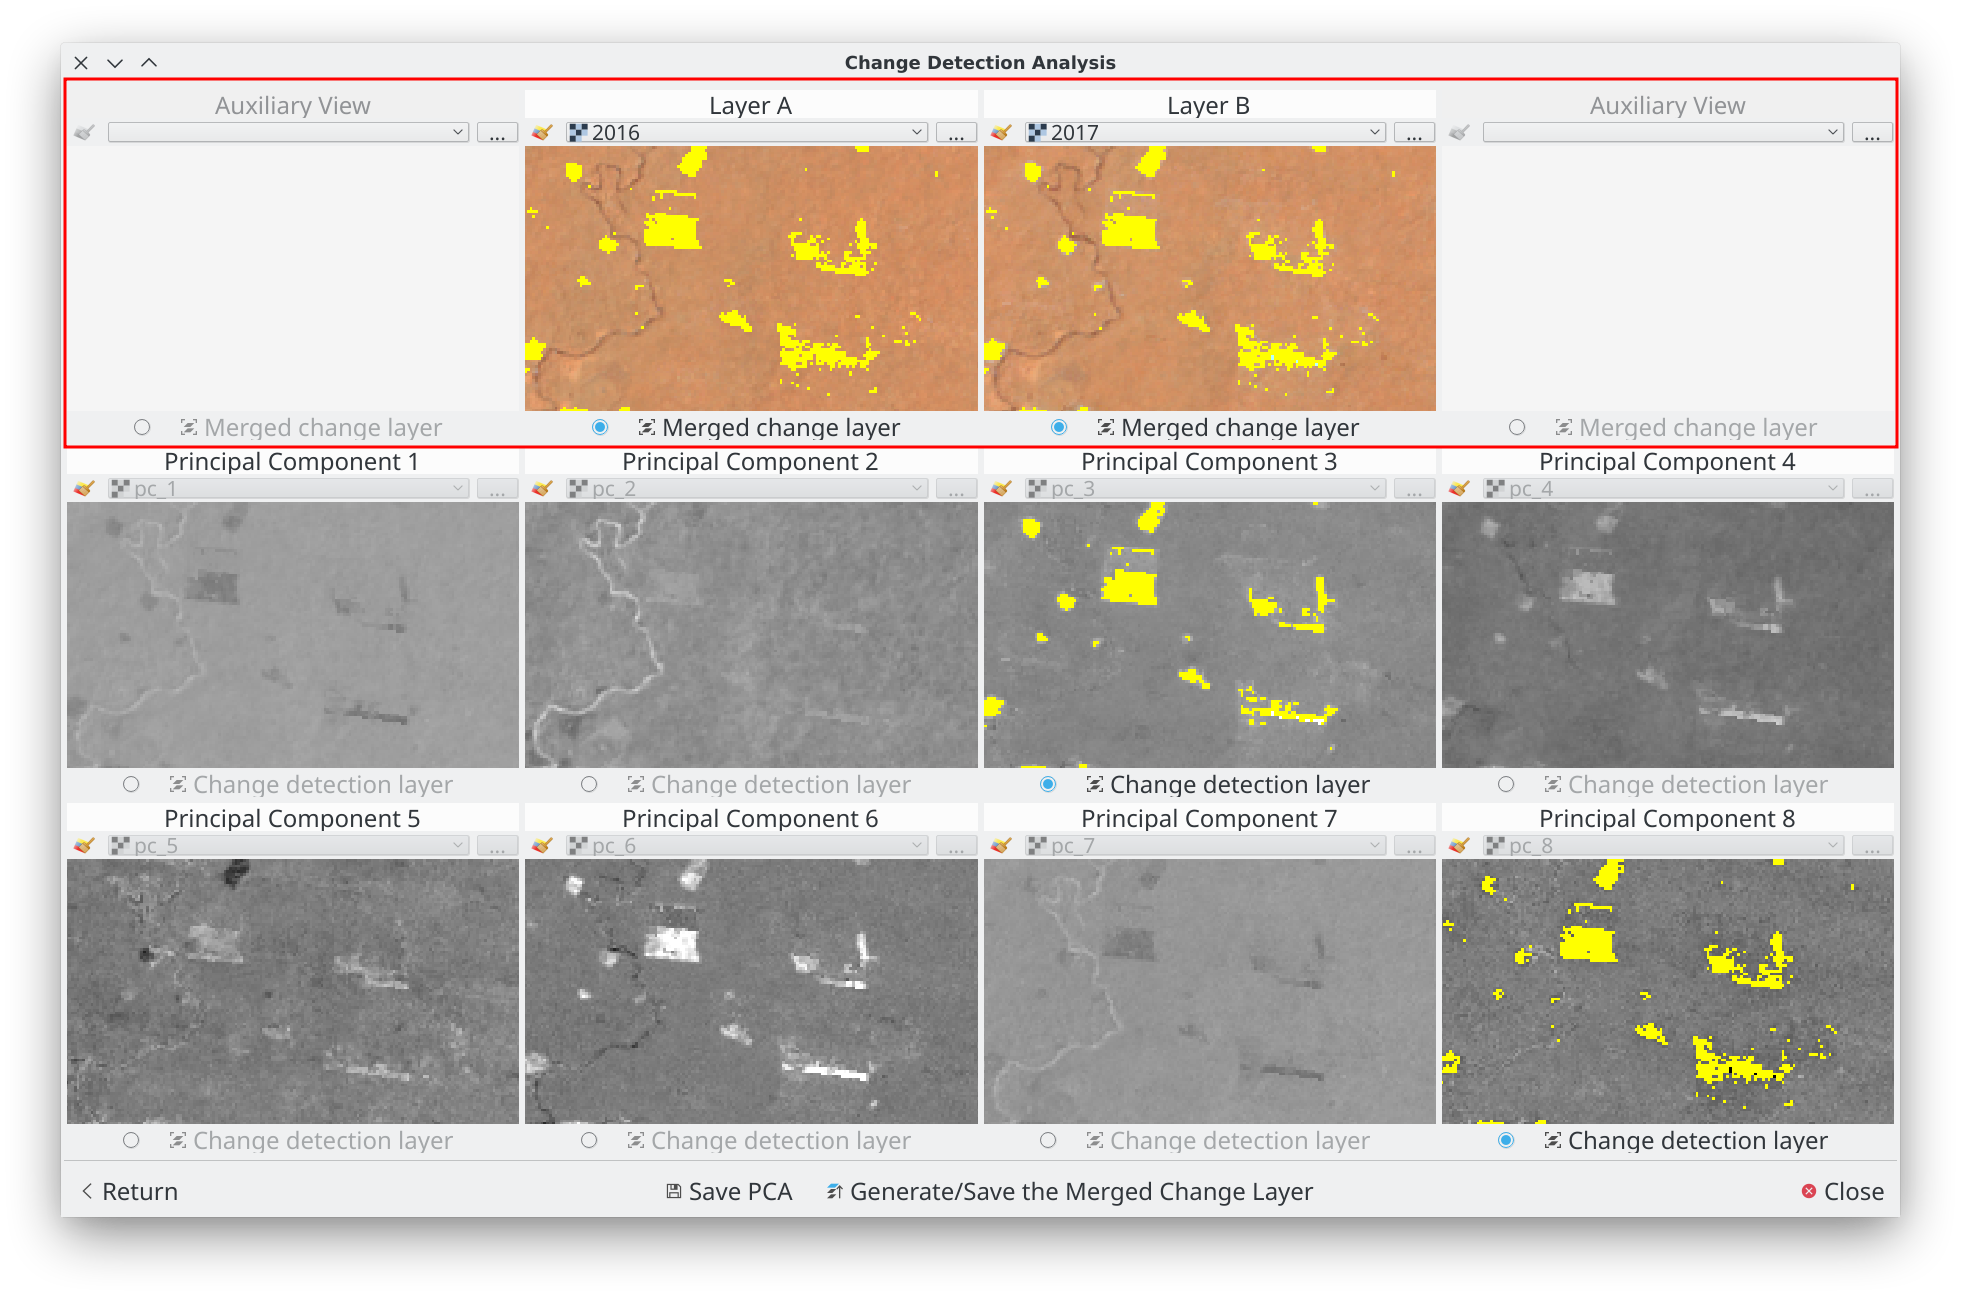
The merged change layer is saved and loaded for all view in the first row, is loaded (if was activated) in Qgis too. You can adjust/regenerate it changing the detection layer by components and merge again.
Finally, you can close the plugin and continue the analysis and adjustments of the final layer in Qgis.
About us
PCA4CD was developing, designed and implemented by the Group of Forest and Carbon Monitoring System (SMByC), operated by the Institute of Hydrology, Meteorology and Environmental Studies (IDEAM) - Colombia.
Author and developer: Xavier C. Llano xavier.corredor.llano@gmail.com
Theoretical support, tester and product verification: SMByC-PDI group
License
PCA4CD is a free/libre software and is licensed under the GNU General Public License.